Note this help article relates to all supplier invoices except for VRBO & Booking.com. Please refer (here) for the rules about loading bills for those suppliers.
As part of the trust accounting process, we need to periodically load property-related bills (maintenance, cleaning etc) against each property inside OTA+. This then allows the owner to see all income and expenses related to their property and allows us to perform the functionality of trust accounting each month.
Each time you receive a bill from a supplier, make note of the property and download the invoice into the appropriate folder on your computer or the cloud.
Now to load the bill into OTA+ (see screenshot below for visual reference for the following steps):

1. Login to OTA+ and go to Suppliers > Unpaid Bills, and click '+ New Bill'
2. Enter the first three letters of the supplier's name into the supplier section and you should be able to select the correct supplier. Alternatively, you can click on the truck icon button to use the search function, then click the 'Select Supplier' button. If the supplier doesn't exist you will need to create a new supplier.
3. Now select the property the bill relates to, by searching and selecting it in the field in the top right corner of the screen.
4. Now select the bill date, due date (the due date will be the same as the bill date if there are no terms or due date specified) and enter the invoice number. Then press TAB - this will load the bill description for the owner ledger.
5. Next you need to load line items onto the bill. Click on the green ‘Add Line Item’ button and load the item detail in the description section. You cannot extend past the length of the box, otherwise it will cause an error, so you will need to summarise any long descriptions. Then press TAB until you get to the ‘Unit Price’ column. Please note, the standard setting is Tax Inclusive, which means you just need to load the gross value of that line item including tax and the system will automatically separate a tax component. If there is no tax on that line item charge, then tab to the Tax Rate column and change the value to 0.
There may be multiple line items on the invoice, so you can keep adding new line items in order to load all of these. Please note, once you reach 5 line items, any subsequent line items will go onto a next page which you can access via the 1, 2 numbers just above the line item section.
Once all the line items are on the bill and the total matches the total on the bill, press Save.
Please note, if the bill has separate line items with tax, but only shows the pre-tax amount for each item, you can change untick the Tax Inclusive box before loading line items and enter the pre-tax amount in the Unit Price column. However, different systems have different rounding rules for tax, so you may find yourself having to edit certain charges to ensure the total in OTA+ matches the total on the bill. If you are out by a cent, you can re-tick the Tax Inclusive button and increase or decrease the total charges for one of the charge items by one cent by entering that revised (total) figure into the Unit Price column.
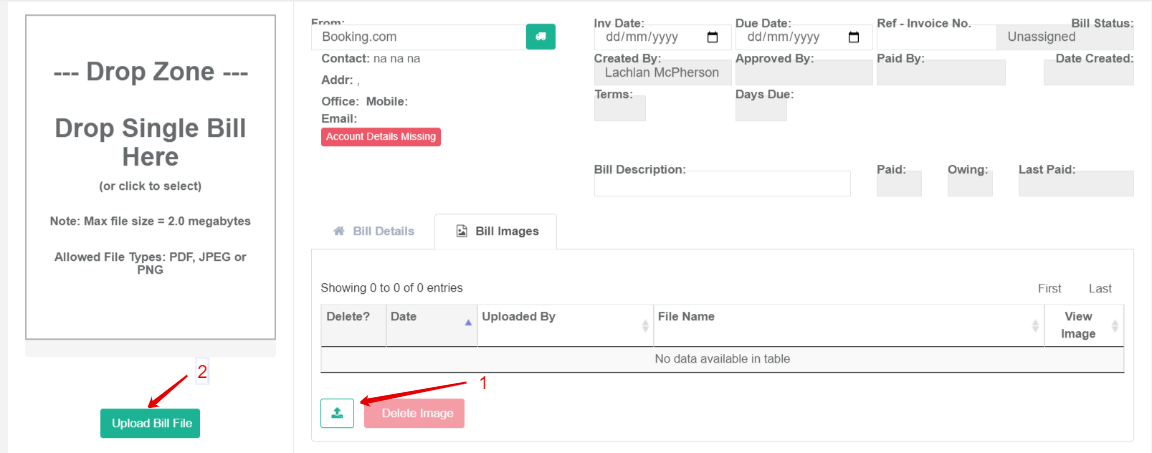
6. Now click on the 'Bill Images' tab.
1. Click on the ‘Toggle Bill Drop Zone’ icon, which looks like a green in tray with an arrow in a box. This will open up the bill loading section.
2. Click in the window and upload the saved file from your computer/the cloud. Once it’s in the window, click on the green ‘Upload Bill File’ button.
If you are submitting an invoice from yourself to an owner and the invoice relates to bills you have already paid on the owner's behalf, you will need to repeat this process until all invoices images have been saved, but make sure you load the scan of your invoice to the owner first.
Once you have loaded the final file, and while it’s saving, you can click on the ‘Toggle Bill Drop Zone’ icon again to close the window. Make sure all scans have uploaded. Sometimes, if the file name is too long, or the file size is too large, it won’t upload. In that instance you will need to rename or resize the file and upload again.
7. Once all attachments are showing, return to the Bill Details tab, click on the green Action button in the bottom right corner and then click on ‘Approve for Payment’. The bill will save and you can then repeat the process for the next bill.